MadMike
1600dp
Posts: 3,277
Joined: Oct 30, 2008 10:21:12 GMT -5
|
Post by MadMike on Oct 5, 2010 8:03:05 GMT -5
Looks like a good seal on the head though?? was the plug tight? Like Dan said could of been worse  You got lucky ;D Be sure to lap the cyl to the head for a good seal with some valve grinding compound or Toothpaste ;D I would just run it on the test stand a few times ,bring it up to temp and let her cool completely a few times.Then ReTorque 8-)no need to pull @1000mi,unless your really anal ;D ;D ;D |
|
|
|
Post by ghiastein on Nov 1, 2010 21:17:53 GMT -5
Bus update ........ Not much going on. Why? Because I have been spending my VW money on other things. Currently I am saving up for rebuilt STOCK single port heads.
But I do have a question.
Currently I have 2 Bus Transmissions both 3 rib. The one in my bus now is from a 1972-1973 Bus. No big deal correct gear ratios but just built a little stronger than a 1970 transmission. My other transmission is from a 1968 Bus still the same gear ratios but its the weakest of all bus transmissions.
Here is the problem the current transmission in my bus whines in forth gear around 40 mph but the noise seams to disappear after 50 mph. I can not tell if it really disappears or if my engine drowns out the whine. It has done this ever since I installed it. Currently I have driven with this transmission for 5,000 miles. I think the noise has gotten louder but I can not be sure because I ears just my be more in tune to the sound.
So should i keep the current whining transmission in the bus or swap it out now while the engine out with the unknown 1968 transmission.
The only thing i know about the 68 transmission is that the odometer of the bus it was pulled from shows 60,000 miles. Now is that 160,000 miles, 260,000, or something different. I also know that the original motor was not in the bus so it was changed. Why? who knows maybe high miles?
Currently I have not had good luck with bus transmissions. If you have been keeping track I am currently on #3.
Any Ideas or Suggestions?
|
|
|
|
Post by ghiastein on Nov 15, 2010 8:40:10 GMT -5
Up date time
I wanted to fix my non working horn. Over the summer I purchased a new horn, installed it and it did not work. So that means that my problem is in the wiring and I am guessing its somewhere in the steering column. Not a fun job.
So 2 weeks ago I removed my whole steering column and instead of just fixing it and installing it back. I decided to paint everything and make it look new again. So my one day project turned into a week long project. Yesterday I finished the install of the column and it looks very nice. The problem is that before I checked everything out I thought about redoing my whole dashboard. So now this is turning into a huge project just to fix my horn.
Engine update.
I dropped off my heads to Greg for a complete rebuild. Thinking that when they are finished I can just bolt and go. In the back of my mind I was thinking of driving the Bus to my Grandparents house for Thanksgiving. I even cleared it with Wifey and she loved the idea.
Well yesterday I was prepping the engine to install the rebuild heads. Cleaning up the pistons I found the #3 looked like it was beat with an ice pick. I am guessing it was from the pieces of valve / spark plug rattling around in there. So now its time for a set of new stock 85.5 pistons and cylinders.
No thanksgiving Bus road trip for me.
I do feel better not rushing things. Now I have the time to clean the engine bay and redoing the sound deadening over the engine.
|
|
|
|
Post by 81pumagtc on Nov 15, 2010 10:15:08 GMT -5
AJ: Hey! Your "quick" projects sound like mine! I'm glad I am not the only one. Mine tend to run like, well, I'll replace the bolt holding down a widget, I take the bolt out, and decide I should do it in stainless. Then I decide since you can see the bolt when you get on your back and slide under the steering wheel, moving wiring aside, the bolts should be polished. THEN I decide that I should paint some brackets with wrinkle-finish paint while I'm under there... THEN I decide...well, it doesn't matter. I just decide to do more stuff. Three weeks later, and $100 worth of hardware, it's done. Fortunately, to combat the feeling of contentment at having finished a job well done, I have found several more jobs that need to be done. Whew! It goes on and on...    Dave |
|
|
|
Post by ghiastein on Dec 9, 2010 10:34:39 GMT -5
Ok Bus update I picked up my heads from Greg. They look very clean and ready to install but I am currently waiting on funds to increase to purchase pistons. Greg replaced all my exhaust valves, cleaned the heads, replaced 5 worn out guides, and resurfaced my valve seats. I am very happy and the price was right. Looky what arrived at my door a few weeks ago......... 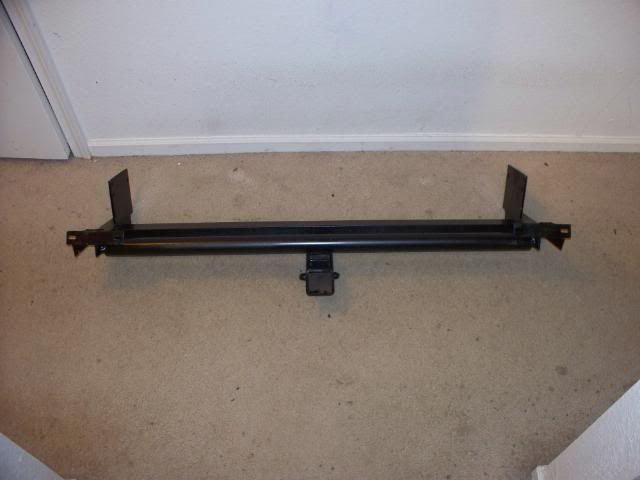 Now its temporarily installed just to check fit. It will have to be removed to install engine when the time comes. 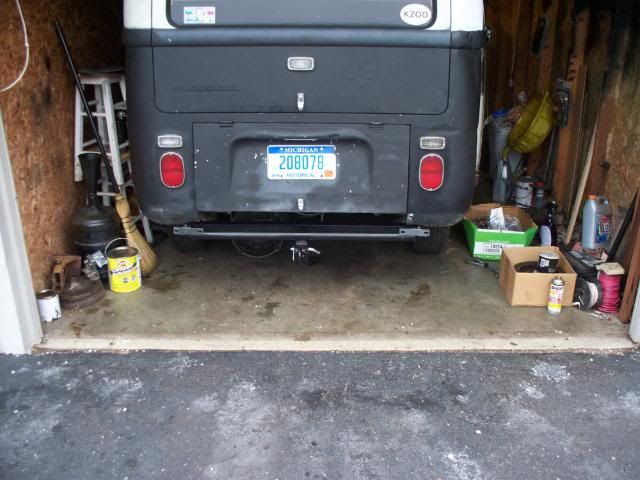 I love the look of the tow hook  I have also cut out my new door panels but they still need more customizing. Pictures of the finished door panels to come. I purchased speakers for the bus I went with some nice Pioneer 6.5 rounds for the front doors and 6x9 for the rear. Hopefully it will sound good. I will also be running a center speaker in the stock location if I can figure out how to run it mono. If not I will just run my (2) 2.5 in the stock location from the front channels. I am also kind of working on a custom dashboard not sure how it will come out. More details to come when I figure out my problem with the dash. Now that I can post pictures again I will post some of the rebuilt heads. |
|
johnw
1500sp
Posts: 291
Joined: Jun 27, 2008 15:45:04 GMT -5
|
Post by johnw on Dec 9, 2010 17:56:54 GMT -5
:)Wow AJ...That is looking great.
JOhn in Plainwell
|
|
|
|
Post by ghiastein on Jan 25, 2011 17:15:42 GMT -5
Been Busy with other stuff and I can't seem to gather up the ambition to brave the cold to work on the Bus. In the mean time I purchased this......  New 85.5 Flat top Cast Mahle Pistons and Cylinder Kit So now I think I have everything to do the job. 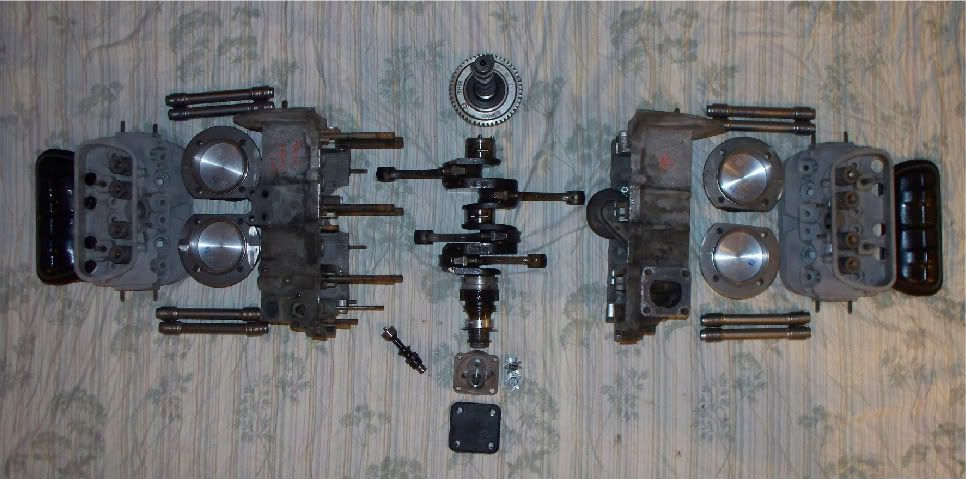 Still some more cleaning needs to be done. Now I just have to get my butt to the garage. |
|
|
|
Post by ghiastein on Mar 14, 2011 7:48:33 GMT -5
Now finally my exploded engine is back together again. All that is left is the exhaust and the mustache bar. I will take pictures later.
I still need to clean up my 1968 Transmission. I plan on opening up the nose cone area and remove the bell housing. Just to inspect stuff and to clean out the junk that rests on the bottom of the case.
I also installed my 1968 visors to match my 1968 LONG STEM MIRROR. If you are tall I would recommend you get the 1968 long stem mirror. it makes looking out that rear window better.
After the transmission is clean and the clutch/flywheel are installed. I might be finally able to install the engine. I am hoping for this next weekend. Lets see what happens.
|
|
|
|
Post by ghiastein on Mar 14, 2011 13:17:25 GMT -5
I just remembered a question I had.
I could not find my can of old silver anti-seize. Do the Brass/Copper exhaust nuts require Anti-Seize?
|
|
MadMike
1600dp
Posts: 3,277
Joined: Oct 30, 2008 10:21:12 GMT -5
|
Post by MadMike on Mar 14, 2011 13:34:53 GMT -5
No ,but it sure wouldn't hurt
|
|
|
|
Post by ghiastein on Mar 16, 2011 8:29:08 GMT -5
Ok picture time Engine ready to install 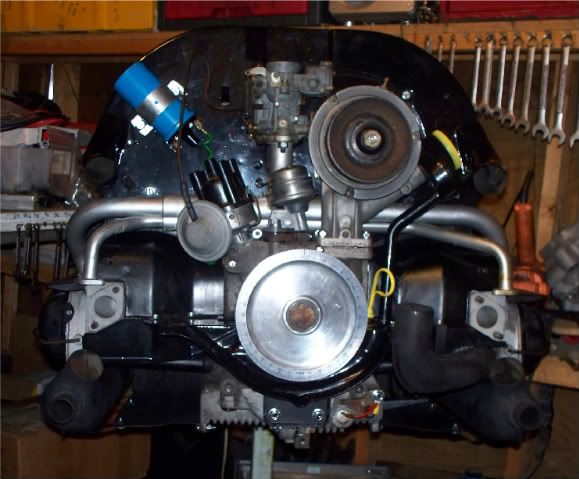 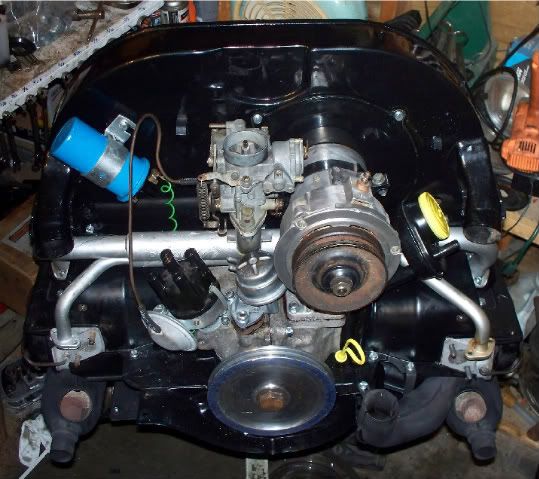 Don't look at the messy cramped garage ok Everyone that has the doghouse style fan shroud need to purchase closed cell foam to seal up the gaps. Don't forget to also seal around your oil cooler too. 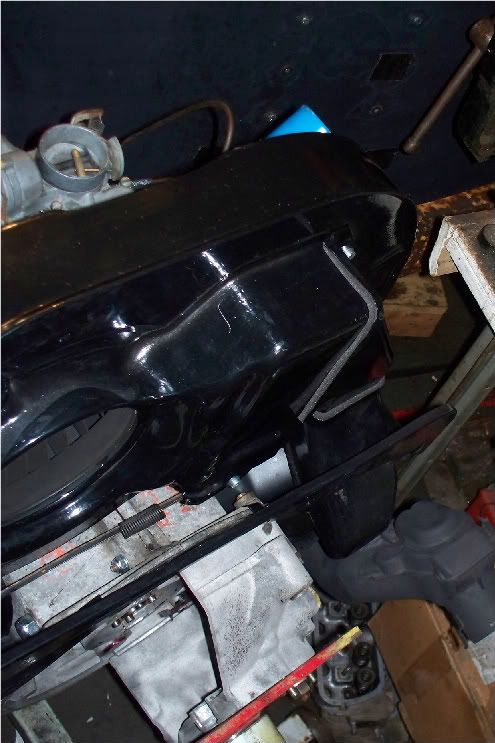 Today I clean up the transmission and hopefully everything will be installed this weekend. |
|
johnw
1500sp
Posts: 291
Joined: Jun 27, 2008 15:45:04 GMT -5
|
Post by johnw on Mar 16, 2011 10:22:49 GMT -5
:)WOW!! That is looking great AJ.
John in Plainwell
|
|
|
|
Post by 81pumagtc on Mar 16, 2011 13:14:25 GMT -5
Lookin' good AJ! The Stealth Bus lives again!
Dave
|
|
|
|
Post by ghiastein on Mar 21, 2011 8:49:59 GMT -5
My Transmission last year was whining in 3rd and 4th gear, but never let me down. I got worried and picked up Transmission from a 1968 Bus that had low miles when I removed it. I believe the low mileage to be correct, because of little wear on pedal pads. I also believe the transmission was original to the Bus, because I had to cut off the shift coupler from the transmission to remove it.
So on Saturday I opened up the 68 transmission to check the internals and to install new seals. I found that the differential, and gears looked good. I did find a little wear on the shift linkage in the nose cone. So I swapped that out with a spare.
I also swapped the 68 transmission into my Bus. So far I have not had good luck with bus transmissions lets hope this one from the 68 does better. The transmission swap went good with no hang-ups just time consuming.
Also on Saturday I decided to tackle the Heater cables. My passenger one was frozen and my drivers side cable was broken somewhere.
The whole assembly sheath and cable removed smoothly from the passenger side. So I just installed the new assembly and it went in without a hitch.
The drivers side was not so nice. As I pulled the sheath on the drivers side it just stretched. The sheath was stuck somewhere in the bus I just kept yanking and it felt like I was pulling on a rubber band. Before it broke internally I gave up and decided to just pull out the cable. The cable removed so nice from the sheath but the sheath was stuck.
So I did the unthinkable.........
I cut the crimped end from my NEW CABLE at the end where it connects up to the heat exchanger.
I was able to send the new cable down the existing stuck sheath. I plan on using a cable connector on the cable near the heat exchanger. It will never be seen again and it should work to adjust heat on the driver side.
I will now be able to adjust the heat in the Bus but I did hate cutting the new cable.
On Sunday I planned to install the engine, and I was really hoping to fire the bus up and go for a test drive. The weather decided that I needed a day of rest. Due to the limited space I have the garage door needs to be open, and I kind of have to work outside to install my engine. I have about 6" from the back of the bus to the garage door. I did not feel like getting wet to install the engine.
Hopefully the rain will quit soon and I can get back to Bus stuff.
|
|
|
|
Post by ghiastein on Mar 21, 2011 18:52:22 GMT -5
My goal last weekend was to fire up the Bus.
Saturday was the day of transmission swap and prepare the engine for install.
What happened I could not get the driver side heater cable out so I cut my new cable to install it ... read above.
Sunday was my day for engine install but alas the weatherman decided we needed rain. So no bus stuff happened.
According the weatherman he feels that Monday was to be the nicest day on the week. I have no idea why he wants Monday to be the nicest day I guess he has not figured out that the calendar says Spring.
So today Monday I set forth to do what was scheduled for Sunday. I knew that I was far from bringing the bus back to life but I was hoping to get some stuff done.
After arranging stuff to slide my engine to the rear of the Bus, I prepared for the install. I made sure that I had all of my nuts, bolts, and washers in order, and that my jack was ready.
So I jacked up the engine and slid it into position. After much wiggling it would not slide in. I spent about 15 minutes of wiggling, jacking, lowering, jacking and more wiggling. Still the engine would not slide into the transmission. About to give up I grab my wimpy jack and stick it under my transmission and raise the transmission a bit. I thought just one more go of wiggling and then I will quit. So I grab my engine push and wiggle and guess what happens. Success the engine now is seated correctly to the transmission.
Now time to bolt it up. I manage to install all 3 of the nuts, but the last bolt you know the one on the upper driver side. No matter how many sockets, extensions, or combinations of such I tried I just could not tighten it up. So I gave up and moved on.
Ok time to install the rear engine support and secure my engine installation. I can always come back to the annoying hard to get to bolt. Thankfully the rear engine support was an easy install and my engine / transmission combo are now supported in the bus.
Next the exhaust.
I have so many install kits that I have purchased to make this an easy install. I have 2 heat exchanger install kits, 1 bus specific muffler instill kit, and 1 bus specific tail pipe install kit. I feel that I am well prepared and ready. My heat exchangers are already installed so thats completed. Next up the muffler it took some wiggling and trial fits but I was able to get everything lined up. So I installed the nuts on the exhaust studs 3 done 1 to go.
Guess what happens next?
SNAP PING POP
That was the sound of my brain exploding when the last exhaust stud BROKE.
I am done defeated and discouraged. The bus will not be running in time for Buggy Builders my goal that I have set for myself has now been destroyed by a simple 8mm exhaust stud.
|
|